
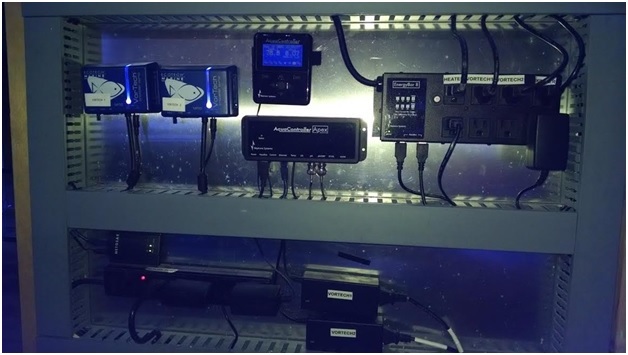
2014-04-05 10.25.06 - Copy.jpgthis is an old photo i have added more items


2014-04-05 10.25.06 - Copy.jpgthis is an old photo i have added more items
Sent from my iPhone using Tapatalk
Extremely tidy setup vinnie. Looks terrific.
Phil.
Thanks Phil changed a little now on the left as started Zeovit
Sent from my iPhone using Tapatalk
Nothing fancy, but good enough for a quick and dirty clean-up. I should probably redo it, but...
Untitled-2.jpg

This is my installation.
Just redid everything a week ago!
IMG_5772.JPG
And also my display:
IMG_5773.JPG
All the best,
Rui
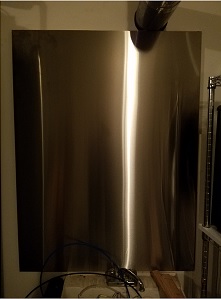
I was inspired by this installation and decided to go with a similar design. I liked the combination of the clean look of stainless and the wire housing that keeps everything organized. I noted the light from above that is shining through the slots in the housing that’s on top and thought that LED’s inside the channels could either look cool or a bit corny.
I started to do the layout on CAD and thought that, not only couldn’t I decide on how it should be set up but that I will surely buy new equipment in the future and want a totally different layout all together. I didn’t want to have old drill holes left over from the previous layouts.
That is when I decided to buy a thin sheet of brushed stainless steel and another sheet of regular steel. I planned to glue them together, attach them both to a plywood board and put that on the wall. That way I could mount some of the equipment via magnets like an old style refrigerator. As I scanned through the equipment that I might want to add to the board, I knew that some of it might be too heavy to be mounted that way. I thought that I wanted to mount 2 industrial peristaltic pumps that would be “ify” and finally, I thought that I would add my RO/ID unit which would definitely not be able to be held via magnets.
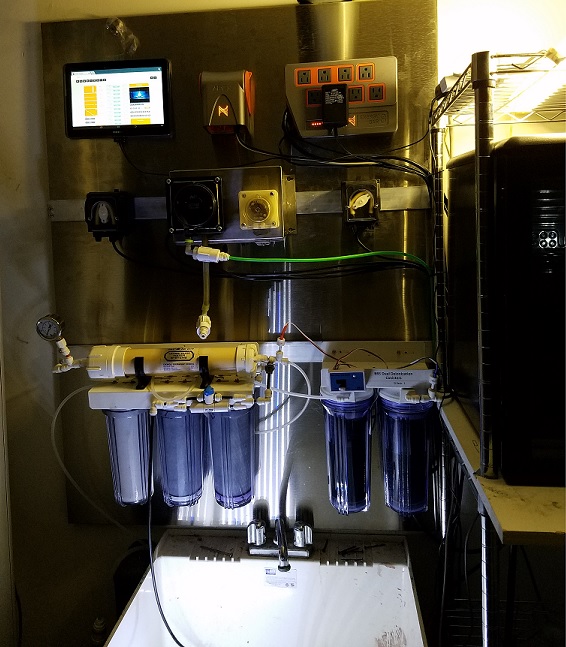
For the RO/DI unit, I used 2” by ¼” flat aluminum bar stock that is attach with “L” brackets and screwed into the sides of the plywood. For the industrial pery pumps, I used the bar stock but also used magnets at the top of the box to keep it from rotating down and away from the board.
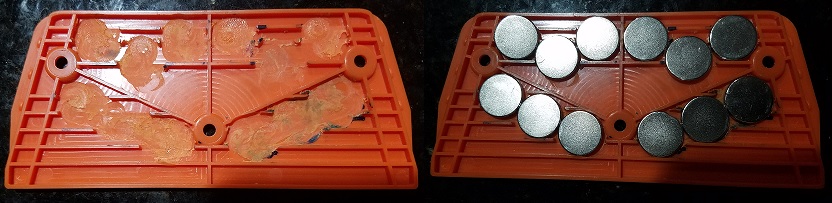
For the Controller and EB8, I added the magnets to the mounting brackets. I was afraid that the magnetism would damage the electronics inside but SO FAR they SEEM to work OK. I used a Dremel tool to remove the ribs where I wanted to add the magnets. Then I attached them using 5 minute epoxy. If the fit is not just right, there isn’t enough time to seat the magnets right. I had to remove a set and re-do them.
For the tablet, I will probably add a block of wood held to the boards with magnets and attach the computer to the block with Velcro.
I haven’t gotten around to adding the wire housing and it may take a while before I get to it being that I have so much yet to do. I’ll let the design settle down a little and then hopefully clean it all up.
[QUOTE=Mal7843;84854]I'm curious to see what others have done with their mounting, wire management, etc. This is something I'm not that great at... so I thought I would look to others to see how they set their systems up. So post a pic of your setup!
The best idea's I've ever had... are ones that I stole!
This is my setup prior to actual usage. I've removed the Jebao 4-port doser. I just like the DoS so much better that I decided I won't use it. I will eventually add a 2nd DoS.
Sent from my iPhone using Tapatalk
Aces,Originally Posted by acesfull44

Looks great. What are the two items on the bottom left? I'm especially interested in the red labeled item. I run a couple Jebao return pumps and am looking forward to the new DCT to Apex controller and am wondering if that's it.
Sent from my iPhone using Tapatalk
I am in the process of building my custom Control/panel inside of a Cabinet that will sit next to my 120 display, I will custom cut a pcs of plywood, sand it and paint it etc etc and cut to fit inside of the cabinet. Ones that's done I can install all of my Apex gear, Leak detection module (ALD), 2 TUNZE controllers, 1 Skimz Protein Controller, 2 ICECAP battery backups, EcoTech M1 controller and my TUNZE ATO controller.. I will also be using the plastic desk grommets under each module to tuck the wires away nice and neat. Ones I complete the job I will post before and after pictures... The cabinet spec are the following: 31 1/2'' (L) x 18 1/2'' (D) x 32 1/2'' (H)..
If you have built something similar to this , please post your pixs so I can see how you did your panel /control board which would be much appercaited..
All the best,
FLSharkvcitim
[QUOTE=alewi28;86316]
What kind of material did you use to make this board and where did you mount it?
Bookcase from Ikea with doors, used a circle saw drill bit to cut holes for cables. Still debating on if i want to leave the doors see-through, so i can at a glance see the hydor wave controllers (until i get wav pumps) and the ATO controller level, or black out the doors and maybe put a big Neptune logo on one and Apex logo on the other.
IMG_1182.jpgIMG_1195.jpgIMG_1181.jpgIMG_1194.jpg
bugee_d, WHAT IS THE BOX that's next to your Net Gear WIFI router?
Do you have a SPS tank? Also, do you have the salinity module and if so how do u like it?
Sent from my iPhone using Tapatalk
Directly to the left is my AI Director that controls my AI Hydra LED's and the controller to the left bottom is my maxspect gyre controller for the wave pumps.
Sent from my SM-G935T using Tapatalk
I changed my idea and mounted all of my gear in my Nano stand instead of buying a new cabinet. I am not done yet still need to mount my Skimz controller and my 2 TUNZE controllers and a few other things and then this project will be finished. I used a few large Oval grommets to hide all of my wires ones it's completed. My pair of EB8 power bars are mounted behind this panel.
Tank Info:
120 Mixed Reef
Apex Classic Controller
ALD & PM2 for Salinity Module
Ecotech M1 pump
Skimz 163 DC Montzer Series skimmer
Custom sump / Refuge
2 TUNZE Turbelle Nanostream 6055's
2 AI Hydra TwentySix HD LED Fixtures
Celestial C35W Maxspect Refuge Spotlight
Aqua UV Ultraviolet Sterilizer 25w
BRS Dual Media reactor
Eshoops IV Master & Slave Doser
Tunze 3155 Auto Top Off
do you remember which stand? i like that a lot!
Sent from my iPhone using Tapatalk
herring_fish I would have been concerned about the electronics and magnets as well. Any noticeable side effects yet?
I'm glad that I scanned your post. I normally don't look at the verbiage much and just look at the pictures but this time I caught my name.
Well the jury is still out. My system says no power for like 30 seconds once or twice every day but I think that it's another issue.
I don't have much hook up to it but what's there, seems to work just fine, except for the notifications.
The way I have it set up, I can pull the magnets off real quickly and set it on a bench. Then I can see if it manifest the same issues. Since it was working okay, I've been pursuing other issues but I guess that l should make this more of a priority.
I have not been able to find anything local for my cabinet for all my apex gear so I am having the custom wood maker that built my stand build me a small cabinet. What size do you guys think is ideal? I want enough room so I can expand, currently I have 3 EB832, along with several modules along with whatever else comes out. I also plan to put a small UPS in the cabinet and 2 power supply for waveline DC12000 pumps
I was thinking 24x12x24, though maybe that overkill, trying to keep the cost down as it all OAK.
Thanks
I've mounted my Apex (2016) inside one of those plastic storage closests you can get at home depot. My wood backboard is 24" x 24" and I JUST have enough room for Apex, 2 x EB832, 4 x modules. I spaced out my modules quite a bit and have wire grommet below each one, so if you did away with that you could potentially squeeze in another couple modules but the EB832's take up a TON of room.
I'll snap a picture of mine when I get home in a couple hours.
 Posting Permissions

 Reply With Quote


Bookmarks